The proper name for a pinhole camera is Camera obscura, which is Latin for ‘dark chamber’. Being inside a cameraobscura chamber is similar to standing inside a giant photographic film
camera
Camera obscuras have been around for centuries. The ancient Greeks
were familiar with the optical principle and in the 4th century BC,
Aristotle wrote about being able to view a partial eclipse of the sun
projected onto the ground by the narrow shafts of light. From the 13th
century AD astronomers would look at sun spots and solar eclipses with
them.
The Italians experimented with the camera obscura in
the sixteenth century, adding lenses and mirrors to
sharpen the image and adapt it for use as a form of
entertainment with projections inside a room, like an
ancient type of cinema.
The camera obscura was used by artists in the
seventeenth century, and portable camera obscuras
were created including one made in a sedan chair (left), 20
and tent-like structures. It is thought likely that Vermeer made use of
the camera obscura to create his paintings, utilising its ability to distil
the confused visual information which strikes the eye onto a flat surface.
A pinhole camera is the simplest camera possible. It consists of alight-proof box, some sort of filmand a pinhole. The pinhole is simply an extremely small hole like you would make with the tip of a pin
A pinhole camera works on a simple principle. Imagine you are inside a large, dark, room-sized box containing a pinhole. Imagine that outside the room is a friend with a flashlight, and he is shining the flashlight at different angles through the pinhole. When you look at the wall opposite the pinhole, what you will see is a small dot created by the flashlight's beam shining through the pinhole. The small dot will move as your friend moves his flashlight. The smaller the pinhole (within limits), the smaller and sharper the point of light that the flashlight creates.
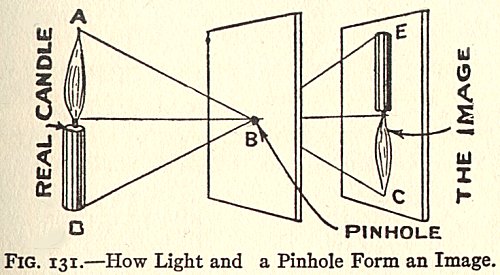
Now imagine that you take your large, dark, pinhole-equipped room outside and you point it at a nice landscape scene. When you look at the wall opposite the pinhole, what you will see is an inverted and reversed image of the scene outside. Each point in the scene emits light, and, just like the flashlight, the beam of light from that point passes through the pinhole and creates a point of light on the back wall. All of the points in the scene do that at the same time, so an entire image, in focus, is created on the back wall of the room. The image is very dim because the pinhole is so small, but you can see it if the room is very dark.
A pinhole camera is simply a smaller version of that room, and the film inside the camera replaces you. The film records the image that comes in through the pinhole. The camera records a nice, in-focus image of the scene that you point the camera at. Usually, you have to expose the film for a long time because the pinhole lets so little light through.
The pinhole in a pinhole camera acts as the lens. The pinhole forces every point emitting light in the scene to form a small point on the film, so the image is crisp. The reason a normal camera uses a lens rather than a pinhole is because the lens creates a much larger hole through which light can make it onto the film, meaning the film can be exposed faster. the image is upside down and back to front in all cameras. In a film camera, if you could look at the film before it was developed, displayed the image exactly as it 'sees' it from the lens, it would be upside down and backwards. That is the way the image is always projected onto the film plane
If you used a old fashioned camera where you got under a cloth cover to focus and put in the film, the image you would see on the glass back of the camera would be upside down and backwards. Seeing the image right-way around is a relatively new feature.
A pinhole does not bend light, you need a black hole to do that and they are a bit of a different proposition all together. The reason is very simple.
Light does not usually bend but travels in a straight line so the light from the top of a scene passes through the pinhole, continues in a straight line, and ends up at the bottom.
Just think of a ray light being like a jet of water from a garden hose being aimed at a hole in the fence; Shoot from the right, it ends up on the left. Shoot from the top, it ends up on the bottom.
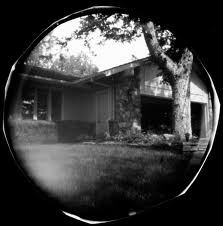
Worldwide Pinhole Photography Day Gallery
The next pinhole day is April 26, 2015
A pinhole camera works on a simple principle. Imagine you are inside a large, dark, room-sized box containing a pinhole. Imagine that outside the room is a friend with a flashlight, and he is shining the flashlight at different angles through the pinhole. When you look at the wall opposite the pinhole, what you will see is a small dot created by the flashlight's beam shining through the pinhole. The small dot will move as your friend moves his flashlight. The smaller the pinhole (within limits), the smaller and sharper the point of light that the flashlight creates.
Now imagine that you take your large, dark, pinhole-equipped room outside and you point it at a nice landscape scene. When you look at the wall opposite the pinhole, what you will see is an inverted and reversed image of the scene outside. Each point in the scene emits light, and, just like the flashlight, the beam of light from that point passes through the pinhole and creates a point of light on the back wall. All of the points in the scene do that at the same time, so an entire image, in focus, is created on the back wall of the room. The image is very dim because the pinhole is so small, but you can see it if the room is very dark.
A pinhole camera is simply a smaller version of that room, and the film inside the camera replaces you. The film records the image that comes in through the pinhole. The camera records a nice, in-focus image of the scene that you point the camera at. Usually, you have to expose the film for a long time because the pinhole lets so little light through.
The pinhole in a pinhole camera acts as the lens. The pinhole forces every point emitting light in the scene to form a small point on the film, so the image is crisp. The reason a normal camera uses a lens rather than a pinhole is because the lens creates a much larger hole through which light can make it onto the film, meaning the film can be exposed faster. the image is upside down and back to front in all cameras. In a film camera, if you could look at the film before it was developed, displayed the image exactly as it 'sees' it from the lens, it would be upside down and backwards. That is the way the image is always projected onto the film plane
If you used a old fashioned camera where you got under a cloth cover to focus and put in the film, the image you would see on the glass back of the camera would be upside down and backwards. Seeing the image right-way around is a relatively new feature.
A pinhole does not bend light, you need a black hole to do that and they are a bit of a different proposition all together. The reason is very simple.
Light does not usually bend but travels in a straight line so the light from the top of a scene passes through the pinhole, continues in a straight line, and ends up at the bottom.
Just think of a ray light being like a jet of water from a garden hose being aimed at a hole in the fence; Shoot from the right, it ends up on the left. Shoot from the top, it ends up on the bottom.
Worldwide Pinhole Photography Day Gallery
The next pinhole day is April 26, 2015
| pinhole.ppt |
YOUR PINHOLE PHOTOGRAPHY ASSIGNMENT:
You will be taking six pinhole photographs and creating a poster to display your work. Please make note of how long you exposed your images, and how long you developed them. Include this information beside each photograph. You can name your pictures if you like. These posters will become part of a larger Photography show that we will be having at the end of our course.
Where do you start? With an AVERAGE size hole (pin), an average hole-film
distance (3-5 inches, and subject illuminated by the sun on a bright day, the exposure will
probably be about 2-5 seconds. If your camera is larger, you’ll need longer exposure.
More than likely, you’ll need at least two tries to get a good image.
You cannot hand-hold a camera “steady” for the times required in this
assignment. It must be made immovable, and the subject must remain still. If not, there
will be a blurred image. You will learn how to develop your pictures in the darkroom by working with a variety of chemicals. You need to take precautions when working with chemicals at all times. The darkroom is not a place to be silly, please be respectful and listen to all instructions and use great care when handling the chemicals so we can all be safe in there and produce quality work.
Most photographic chemicals come in concentrate form, which needs to be mixed with water. You are going to use the graduated cylinder to measure the chemicals and water, and the gallon jugs to store them.
The Developer - 1:3 Chemical to water mix. That is, 1 part developer to 3 parts water. This gives you a "stock" solution. Fill one gallon jug with this stock solution. The stock solution will be diluted more before using it on the film. When you dilute the stock solution, you will have a "working" solution.
The Stop Bath - 1:63 Chemical to water mix. Mix the stop bath and water together and store in a gallon jug. This is a working solution.
The Fixer - 1:4 Chemical to water mix. Mix the fixer and water together and store in a gallon jug. This is also a working solution.
Hypo-Clearing Agent - Mix the full packet (4.4oz) with 1.25 gallons (4.7 L) of water. This chemical comes as a powder, and you need to ensure that it is thoroughly mixed. Store in a gallon jug.
When processing, remember to leave the image in the developer for the full time
(usually 1-2 minutes) or until the black tones are fully saturated.
a. If image is too light, re-expose to more light (try double or more!).
c. If image is too dark, it needs to be re-exposed to less light (half or less).
Remember to fix the image in good fixer for 2-4 minutes, wash at least 5 minutes in fresh
water, and dry.
When finished, take good care of your print. You will scan your six best images into the computer, make a collage using Photocat, and upload them here for grading. Your scanned images are worth 25, the poster is worth 50 and the presentation is worth 25 for a total of 100 marks.
How to Make and Use a Pinhole Camera
Can Or Box Pinhole Camera
A pinhole camera is a small, light-tight can or box with a black interior and a tiny hole in the center of one end. By using common household materials, you can make a camera that will produce pictures.
The Box
When you make a pinhole camera for roll or sheet film, use a small can or box as the camera body. You can use anything that has a tight-fitting top - a clean paint can, a vegetable shortening can, a 2-pound coffee can, a shoebox, or even a cylindrical oatmeal box.To make the can light-tight, paint the inside with dull black paint or line it with black paper to prevent light reflections. If the can you use has a plastic lid, paint the lid black.
Be sure to paint it inside and out; then before using it, check to make sure no paint has chipped off. Chipped or peeling paint on the lid will allow light to enter the camera and ruin your pictures.
Pinhole camera
made from a can.
The Pinhole
The film will be attached to the inside of the lid so you will need to make the pinhole in the bottom end of the can. You can make the actual pinhole in the can itself, but it's much easier to make it in a separate piece of heavy black paper or thin metal and fasten this piece over a larger hole cut in the center of the bottom end of the can. Heavy-duty aluminum foil, a piece of aluminum cut from a soda can or the backing paper from Kodak 120 size roll film is good for this purpose.
The distance of the film from the pinhole and the diameter of the pinhole will determine the angle of view and sharpness of your final image. For a camera with the pinhole 3 to 6 inches from the film, you'll get the best results if the pinhole is about 1/75 inch in diameter. You can make a hole this size by pushing a No. 10 sewing needle through the paper or metal to a point halfway up the needle shank. The pinhole should as circular as possible.
TIP: You'll get a smoother hole if you rotate the needle as you push it through. If you're using aluminum foil or paper, sandwich it between two lightweight cards while you make the pinhole. This will help you make a smoother, rounder hole.
If you are using a piece of aluminum from a soda can, place it on a hard surface and make a small hole in the aluminum with an awl or an ice pick. Don't press too hard==the tip should just barely break through the surface. See illustration. Enlarge and smooth it by pushing a No. 10 needle into it from the indented side. You can smooth any rough edges with very fine sandpaper.
Pinhole Awl
You should now make a hole 1/4 inch or more in diameter in the center of the bottom end of the camera body and tape your pinhole in position over the center of the hole.You can check your pinhole to make sure it's perfectly round by looking through the back of the camera. To see if the image is clearly visible, aim the camera toward a printed page to determine if you can see the letters clearly.
The Shutter and Viewfinder
The shutter for the camera can be a flap of opaque dark paper hinged with a piece of tape. Use a small piece of tape to hold the shutter closed before and after you take a picture.
A viewfinder for a pinhole camera, while not necessary, can be made of 2 pieces of cardboard or wire. The front frame of the viewfinder should be same shape and slightly smaller than the film and located directly above the pinhole at the front of the camera. The rear frame is a sighting peephole directly above the lid of the can and aligned with the center of the front frame.
When you aim your camera at subjects closer than 5 feet, position the subject low in the viewfinder to allow for parallax--the difference between the view you see through the viewfinder and the image recorded on the film. This effect is caused by the separation between the viewfinder and the pinhole.
Loading a Can or Box Pinhole CameraYou can load the camera either with film or fast photographic paper. Your choice of film or paper may depend in part on the exposure times. Paper, because it is less sensitive to light than film, will probably require an exposure of about 2 minutes for sunlit subjects. Film may require only 1 or 2 seconds for subjects in sunlight.
Paper is easier to handle since you can load it into the camera under a safelight. If you don't have a safelight, you can work by the light of a flashlight covered with several thicknesses of red cellophane paper placed 6 to 8 feet away. Most film, on the other hand, must be handled in total darkness.
If you use film, you can cut up a roll of KODAK TRI-X Pan Film or KODAK T-MAX 400 Profesional Film, 120 size, into 2 3/8-inch squares or 2 3/8 x 3 1/2-inch pieces. This must be done in total darkness, of course. At night a closet will probably be dark enough if lights in adjoining rooms are turned off. Sheet film, such as KODAK Tri-X Pan Professional Film, is easier to use because it's flat.
A camera made from a 2-pound coffee can will take a 2 1/4 x 3 1/4-inch piece of film or photographic paper. You can use a 3 1/4 x 4 1/4-inch piece if about 1/2 inch is clipped from each corner of the film or paper. A camera made from a 1-gallon paint can will take a 4 x 5-inch piece of film or paper.
When you have the size of paper or film you need, tape it firmly to the inside of the end of your camera opposite the pinhole. The emulsion should face the pinhole. The emulsion side of photographic paper is the shiny side. The emulsion on roll film is on the inside of the curl. Sheet film is identified by notches cut into one of the shorter sides. When you hold the film in a vertical position with the notches in the top edge toward the right side, the emulsion is facing you. Another way to determine the emulsion side of either paper or film is to touch both sides with a moistened finger. The emulsion side will feel slightly tacky. Test near the edge to avoid a fingerprint in the center of the picture. You will need to tape down the four corners if you use cut-up roll film or paper. Taping two diagonal corners will work for sheet film. Close the camera, making sure the shutter is closed.
It's a good idea to practice with an exposed piece of film or paper before trying the load the camera for your actual picture taking.
Exposure
To get clear, sharp pictures, your camera must remain very still while the shutter is open. Use plenty of tape or a lump of modeling clay to hold your camera still. Lift the black paper to uncover the pinhole and keep the pinhole uncovered for the recommended time. Cover the pinhole with the black paper between exposures.The following table gives approximate exposure recommendations for a pinhole camera. It's a good idea to make three exposures of different durations for each scene to improve the likelihood you'll get a good picture.
KODAK Film Bright Sun Cloudy Bright TRI-X Pan, T-MAX 400, or ROYAL Pan Film 4141
(ESTAR Thick Base)1 or 2
seconds4 to 8
secondsT-MAX 100 Film2 to 4
seconds8 to 16
seconds
Processing and PrintingProcess and print film negatives in the usual way. Dry the paper negative and make a contact print from it in the normal way, with the emulsion (picture) side of the paper negative toward the emulsion (shiny) side of the printing paper.